In this guide, you are going to learn the basics of Landing Pages for Pay Per Call marketing and how to setup a landing page, domain, hosting and CDN with Amazon Web Services (AWS).
Landing Page Basics
A landing page is a standalone page created for the sole purpose of getting a visitor to complete a conversion. Landing Pages are used by digital marketers, media buyers and Pay Per Callers to generate conversions, calls, and leads for their marketing campaigns.
These types of pages are effective because they isolate the Call-to-Action and drive your visitors to take a specific action. Your landing page is a virtual elevator pitch. It’s a one-page summary of your offer that provides visitors all they need to know to decide whether or not to convert.
At it's core, a landing page consists of the following elements:
Pay Per Call Landing Page Packs
Ringba has created several collections of free Pay Per Call Landing Pages. These landing page packs are the quickest way to setup a complete pay per call funnel for your next campaign.
GET THE PAY PER CALL LANDING PAGE TEMPLATES PACK
This free collection contains complete Website templates for 41 Pay Per Call verticals with graphics, icons and color options for AB testing. You can also use these templates when outsourcing by sending them to freelance designers, developers and / or copywriters.
How To Use Your Pay Per Call Landing Pages

How to Setup a Landing Page with AWS
In order to setup your landing page, you're going to need:
Before we get started, you need to create an AWS account if you don't have one yet. We will be using three primary Amazon services: Route 53, S3 and Cloudfront.
Register a Domain Name with Route 53
AWS Support Article
To get a domain name for our landing page, we'll be using Route 53. Route 53 is a system for registering and managing domain names. Your domain name doesn't have to be perfect, but you still need one. If you're not willing to spend $10 on a domain name, you probably shouldn't be getting into Pay Per Call.
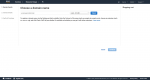
To register a domain name with Route 53, we will go to the Route 53 console and register a new domain.
Follow their instructions to register and verify your purchase. We will connect it to our hosting after we've setup web hosting with S3.
Setup Web Hosting with Amazon S3
AWS Support Article
To host our landing page, we'll be using Amazon S3. With S3, we can create 'buckets' to host and serve our content, set permissions and configure out buckets for website hosting. Amazon's free tier. To setup hosting with S3, we will go to the Amazon S3 console. We'll need to create two buckets, one for the 'root domain' version and one for the 'www subdomain' version.
Configure the 'root domain' Bucket
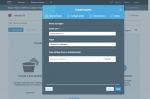
First, let's setup and configure our 'root domain' bucket.
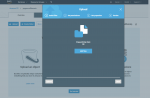
Next, upload all your web content to the 'root domain' bucket.
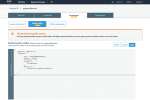
Now we'll need to add a Bucket Policy for Public Read Access. Click 'Permissions" then "Bucket Policy" and add the code below (replace 'example.com' with the name of your Bucket).
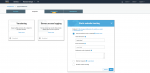
Now we need to enable web hosting for the 'root domain' bucket. To enable web hosting go to 'Properties' and select 'Static website hosting'. In the 'Index document' box, type the name you gave your Index page and click 'Save'.
Make note of the "Endpoint" for this bucket; you will need for configuring your redirect from the 'www subdomain' Bucket and connecting it to your domain.
Configure the 'www subdomain' Bucket
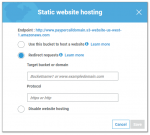
Create another Bucket for the 'www' version of your domain. We'll do this to redirect visitors who use the 'www' version to our 'root' bucket. Add a Bucket Policy (remember to replace to use the name of your bucket instead of the example domain). For web hosting, we'll
select 'Redirect request' and use the name of our primary bucket.
Make note of the "Endpoint" for this bucket; you will need for connecting it to your domain.
Connect Buckets to Domain Name
Now we need to connect our Buckets in S3 to our Domain in Route 53. To do this, we need to add Alias records for both our buckets. Go to the Route 53 console and go to 'Hosted Zones' from the navigation pane. Find the domain and select "Create Record Set". For the 'root domain' version, accept the default, choose 'A - IPv4 address' and for 'Alias', choose 'Yes' and enter the 'Website Endpoint". Accept the other default settings and click 'Create'. Repeat the same process for the 'www.' version (include 'www.' in the Alias Name).
Configure a CDN with Amazon Cloudfront
AWS Support Article
To speed up our entire site, we'll create a content delivery network (CDN) using Amazon Cloudfront. Cloudfront makes your website available from data centers around the world. When a user visits your landing page, they will automatically be served a copy of your website from their nearest location. This results in significantly faster performance and load-times. To create a Cloudfront Distribution for each bucket and then you'll need to update your record sets in Route 53.
Take a look at these before and after results from a speed test by Mobidea:

Next Steps
With your landing page setup, it's ready to receive traffic! Here are some ideas of things you can do with your new landing page:
Further Reading
Landing Page Basics
A landing page is a standalone page created for the sole purpose of getting a visitor to complete a conversion. Landing Pages are used by digital marketers, media buyers and Pay Per Callers to generate conversions, calls, and leads for their marketing campaigns.
These types of pages are effective because they isolate the Call-to-Action and drive your visitors to take a specific action. Your landing page is a virtual elevator pitch. It’s a one-page summary of your offer that provides visitors all they need to know to decide whether or not to convert.
At it's core, a landing page consists of the following elements:
- Offer / Unique Value Proposition - Write a compelling headline and subheadline.
- Images and Graphics - Use high quality and relevant imagery related your vertical.
- Body - Write descriptive body copy, discuss the benefits and outcomes of your offer and drive your visitor to act.
- Call To Action (CTA) - Keep your CTA clear and actionable.
- Keep important information 'above-the-fold'.
- Avoid visual clutter.
- Content should be unique, valuable and error free
- Avoid grammatical and spelling errors.
- Put yourself in the mindset of the customer.
- Get right to the point and make sure the user knows what to do next.
- Page titles (max 78 characters) and meta descriptions (max 130 characters) are unique and descriptive.
- Images have seo-friendly file names and alt-tags.
- Run a Chrome SEO Audit (Inspect -> Audits -> Run Audits)
- Landing page markup has been validated // run a validator test
- Landing page is mobile responsive // run a device responsiveness test
- Landing page displays correctly on all resolutions // run a resolution test
- Landing page displays and functions on all browsers // run a browser test
- Landing page loads quickly // run a speed test
- Landing page has been audited // run an seo audit
- Remove links and reduce friction.
- Testing your images, colors, copy, buttons, etc.
Pay Per Call Landing Page Packs
Ringba has created several collections of free Pay Per Call Landing Pages. These landing page packs are the quickest way to setup a complete pay per call funnel for your next campaign.
GET THE PAY PER CALL LANDING PAGE TEMPLATES PACK
This free collection contains complete Website templates for 41 Pay Per Call verticals with graphics, icons and color options for AB testing. You can also use these templates when outsourcing by sending them to freelance designers, developers and / or copywriters.
How To Use Your Pay Per Call Landing Pages
- Download the zip and extract the files.
- Change the design, update the copy and edit the source files however you'd like.
- Upload to your web hosting service (we recommend AWS).
How to Setup a Landing Page with AWS
In order to setup your landing page, you're going to need:
- Domain name - Used for directing visitors to a website using an easy to remember name.
- Web hosting - Used for storing and serving web content to visitors.
- Content Delivery Network (CDN) - Used for improving load-speed, page performance and scaling traffic.
Before we get started, you need to create an AWS account if you don't have one yet. We will be using three primary Amazon services: Route 53, S3 and Cloudfront.
Register a Domain Name with Route 53
AWS Support Article
To get a domain name for our landing page, we'll be using Route 53. Route 53 is a system for registering and managing domain names. Your domain name doesn't have to be perfect, but you still need one. If you're not willing to spend $10 on a domain name, you probably shouldn't be getting into Pay Per Call.
To register a domain name with Route 53, we will go to the Route 53 console and register a new domain.
Follow their instructions to register and verify your purchase. We will connect it to our hosting after we've setup web hosting with S3.
Setup Web Hosting with Amazon S3
AWS Support Article
To host our landing page, we'll be using Amazon S3. With S3, we can create 'buckets' to host and serve our content, set permissions and configure out buckets for website hosting. Amazon's free tier. To setup hosting with S3, we will go to the Amazon S3 console. We'll need to create two buckets, one for the 'root domain' version and one for the 'www subdomain' version.
Configure the 'root domain' Bucket
First, let's setup and configure our 'root domain' bucket.
Next, upload all your web content to the 'root domain' bucket.
Now we'll need to add a Bucket Policy for Public Read Access. Click 'Permissions" then "Bucket Policy" and add the code below (replace 'example.com' with the name of your Bucket).
Code:
{
  "Version":"2012-10-17",
  "Statement":[{
    "Sid":"PublicReadGetObject",
        "Effect":"Allow",
      "Principal": "*",
      "Action":["s3:GetObject"],
      "Resource":["arn:aws:s3:::paypercalldomain/*"
      ]
    }
  ]
}
Now we need to enable web hosting for the 'root domain' bucket. To enable web hosting go to 'Properties' and select 'Static website hosting'. In the 'Index document' box, type the name you gave your Index page and click 'Save'.
Make note of the "Endpoint" for this bucket; you will need for configuring your redirect from the 'www subdomain' Bucket and connecting it to your domain.
Configure the 'www subdomain' Bucket
Create another Bucket for the 'www' version of your domain. We'll do this to redirect visitors who use the 'www' version to our 'root' bucket. Add a Bucket Policy (remember to replace to use the name of your bucket instead of the example domain). For web hosting, we'll
select 'Redirect request' and use the name of our primary bucket.
Make note of the "Endpoint" for this bucket; you will need for connecting it to your domain.
Connect Buckets to Domain Name
Now we need to connect our Buckets in S3 to our Domain in Route 53. To do this, we need to add Alias records for both our buckets. Go to the Route 53 console and go to 'Hosted Zones' from the navigation pane. Find the domain and select "Create Record Set". For the 'root domain' version, accept the default, choose 'A - IPv4 address' and for 'Alias', choose 'Yes' and enter the 'Website Endpoint". Accept the other default settings and click 'Create'. Repeat the same process for the 'www.' version (include 'www.' in the Alias Name).
Configure a CDN with Amazon Cloudfront
AWS Support Article
To speed up our entire site, we'll create a content delivery network (CDN) using Amazon Cloudfront. Cloudfront makes your website available from data centers around the world. When a user visits your landing page, they will automatically be served a copy of your website from their nearest location. This results in significantly faster performance and load-times. To create a Cloudfront Distribution for each bucket and then you'll need to update your record sets in Route 53.
Take a look at these before and after results from a speed test by Mobidea:
Next Steps
With your landing page setup, it's ready to receive traffic! Here are some ideas of things you can do with your new landing page:
- Setup Ringba for Call Tracking
- Setup Google Analytics for Web Analytics
- Run Paid Traffic
- Optimize Your Landing Page
Further Reading
Attachments
-
 830.2 KB Views: 33
Last edited: